6.1.3. Working with controller in LabView
Important
Our LabView examples only work for Windows.
The bitness of the LabView examples should match the bitness of the operating system, not the bitness of LabView
The examples below are for LabVIEW version 12. The correct operation of the examples with later versions of LabVIEW is not guaranteed.
Should you need examples for versions below 12, please contact technical support
or send an e-mail: 8smc4@standa.lt
Note
Libximc library opens controllers in exclusive access mode.
Any controller opened by libximc needs to be closed before it may be used by another process.
Do not stop Labview examples which uses libximc with the “Abort execution” button - this doesn’t give the
running program a chance to call the close_device() function, thus all opened controllers will be locked
and inaccessible until you close Labview environment entirely.
6.1.3.1. How to create a simple example
Download Labview examples from the Software page.
Let’s review how to create a simple Labview program with libximc library using “Ximc simple example.vi”.
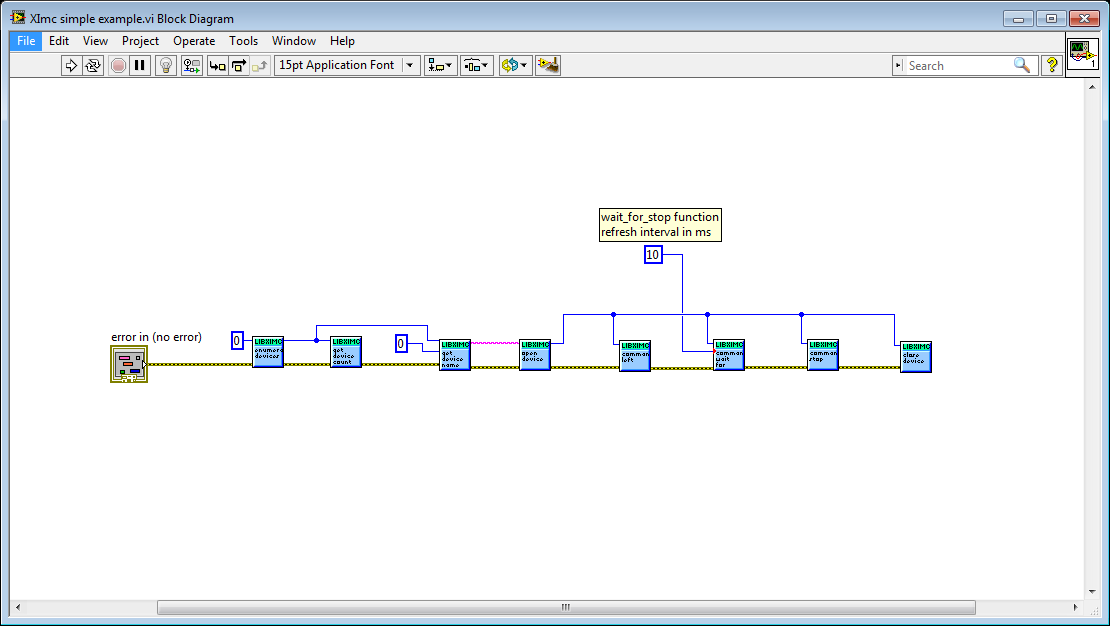
Ximc simple example block diagram
The program starts by calling enumerate_devices function and passing it the enumerate flags parameter
(for details see Programming guide).
Result of the enumerate_devices function call is an opaque pointer and is passed to the get_device_name
function together with device number, whose name we want to find out (one can get total number of found devices
by passing the same opaque pointer to the get_device_count function).
Result of the get_device_name function call is a string, which is passed to the open_device function.
This function call sequence is not mandatory (though recommended) - one can
manually form device name string and pass it to the open_device function directly.
Result of the open_device function call is a device handle, or a ximc.h header constant device_undefined, which is returned if libximc
could not open specified device. Device handle is passed to all functions which read data from the controller, write data to the
controller or send commands to the controller, together with appropriate parameters if necessary by function prototype.
“Ximc simple example.vi” calls command_left, command_wait_for_stop and command_stop as an example.
After you stop using the controller you need to close its handle by passing it to the close_device function.
After you stop using enumerate_devices result you need to free allocated memory pointed to by this opaque pointer by
passing it to the free_enumerate_devices function (not shown in this example).
6.1.3.2. Ximc Example One Axis: Setup and Launch in LabVIEW
Important
The “Ximc Example One axis.vi” is a simple to use but quite complicated pseudo-XILab example that is not recommended to modify by yourself. Take a look at the “ximc simple example.vi”. This example is easy to adaptate for your purposes.
LabVIEW uses the libximc library to interact with controllers. The
interface is accessible via LabVIEW is completely analogous to the libximc
library interface. A detailed description of the functions, data
structures and flags can be viewed on this site.
Each function has a corresponding subVI module, which has inputs and
outputs corresponding to input and output parameters of this function.
To call any libximc function one should first enumerate devices by using
enumerate_devices, then pick any device from the list and open it
using open_device function, then pass resulting handle to desired
libximc function. After you’re finished using the device it should be
closed with close_device function.
Extract the archive and run “Ximc Example One axis” file using Labview.
LabView environment will start. You will see graphical user interface of the front panel of the example, which looks like a simplified XILab interface:
- In the left part of the window you can find a “Find controllers” button to rescan available controllers, a field to pick the controller by its serial port name and an information block which displays current opened controller state (power and usb voltage and current, temperature and movement speed).
- In the central part of the window you will find indication and control block. This block contains a numeric field with current position, left, right and soft stop buttons, controls to move to specified coordinate and shift on specified offset.
- To the right of this block you can find “HOME”, “ZERO”, “STOP” and “Exit” buttons, which perform homing, zero current controller position, perform fast stop and exit the example, respectively.
- The rightmost block is a “Move settings” dialog, which demonstrates how you can load and save settings to the controller. When you press its “GET” button current movement settings are loaded into the fields below this button and the “SET” button sends values from its edit fields to the controller.
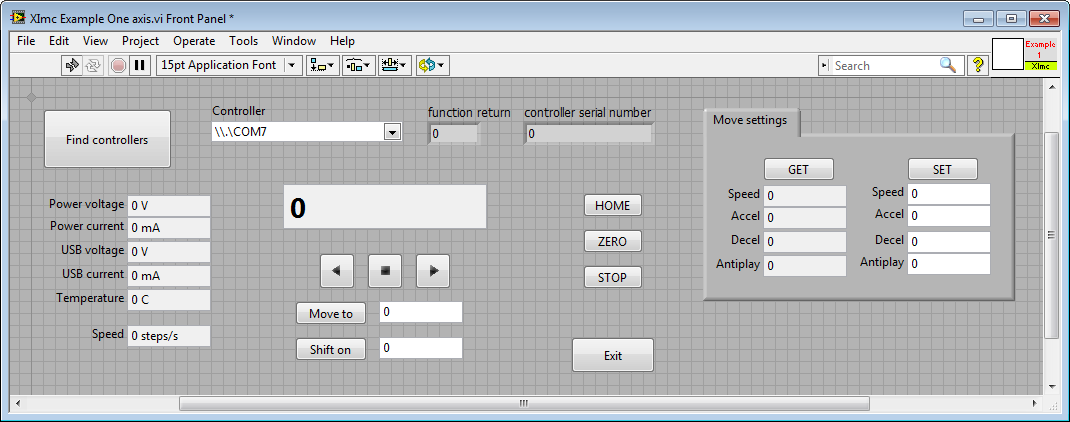
Ximc Example One axis interface
Example source can be viewed by entering edit mode. The example queries the controller status in an infinite loop and outputs the results. If you press any button on the front panel, the corresponding function block of the example will be launched.
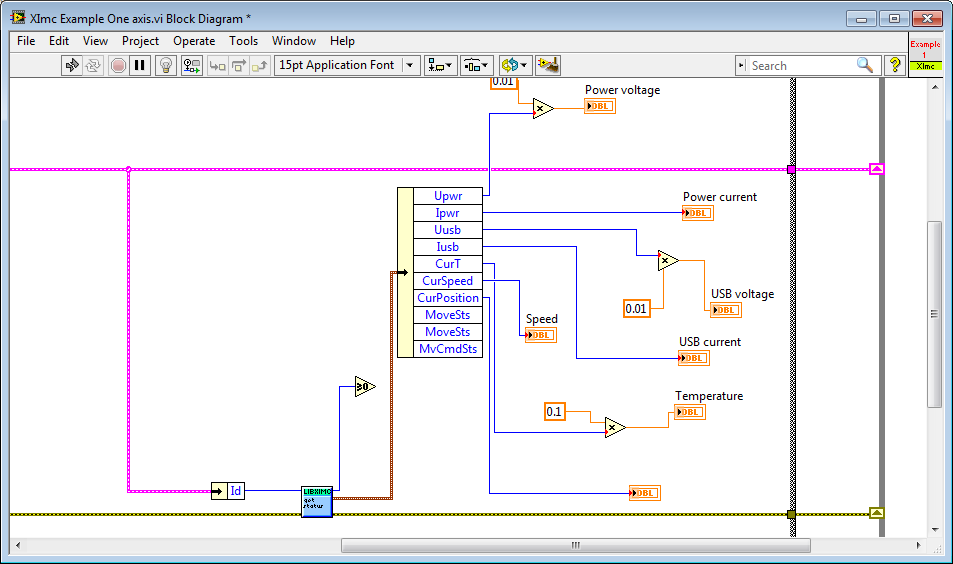
Ximc Example One axis block diagram