5.2.3. XILab Main window in multi-axis control mode
Important
XILab allows you to open up to 32 axes at the same time, but only the first 3 (X/Y/Z axes) will be displayed in the multi-axis interface.
However, it is possible to work with other open axes (those that are not visually displayed in XILab), for this you need to use the XILab scripting language.
To visually work with a large number of axes (more than three), you will need to launch several XILab windows.
For example, you have a 5-axis controller, then in the first XILab window you can open the first three axes, and in the second window the remaining two.
If you need to open more than 3 axes in one window and visually control them, you can use unsupported examples written by in C and Python
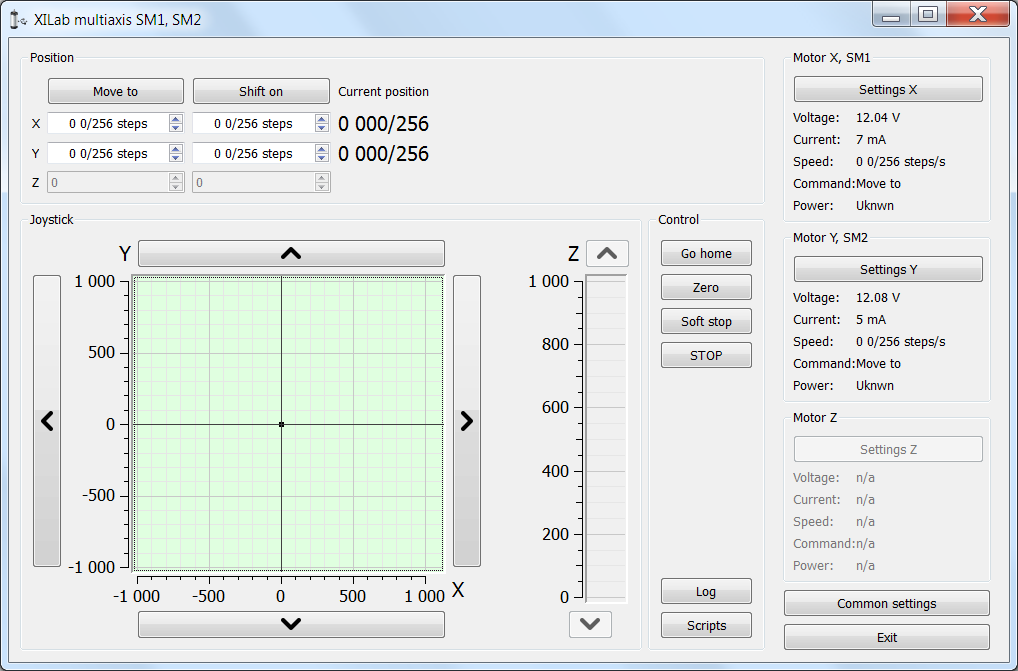
XILab Main window
In the top left part of the screen in the Position parameter group there are indicators of the current position. In the bottom left part of the window there is the Joystick and Control blocks, which are a graphical control element for several axes and a button block respectively. In the top right part, in the Motor blocks data on the current status of controllers and connected motors is located. In the bottom right part of the window there is a group of buttons for application control as a whole. Let us consider these groups in more detail.
5.2.3.1. Motion control block
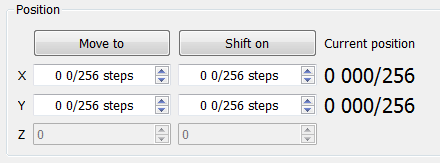
Motion control block
In the Current position column indicators of the current position in steps or calibrated units (see below) for the axes X, Y and Z (from left to right) are located. The Move to button performs movement to the coordinate given by the controls of its column, and the Shift on button performs shift on a specified distance from the current position. If one of the controllers is temporarily absent or disabled, the corresponding line becomes grayed out.
5.2.3.2. Virtual joystick block
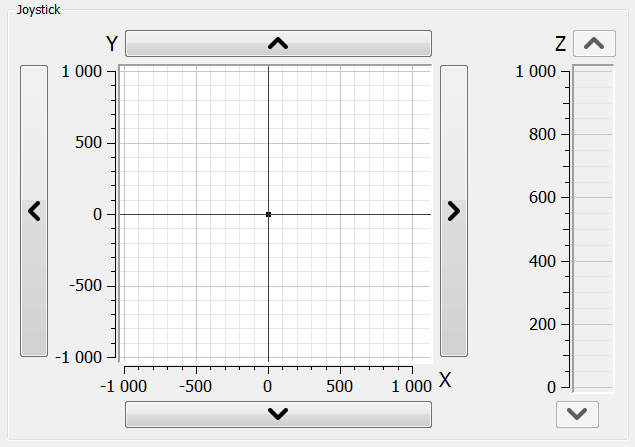
Virtual joystick block
In this block, the current coordinate of the controllers is visualized as a dot with two lines on the plane for X-Y axes and the line for the Z axis.
There are several possible ways to control movement of the controllers:
- When you click anywhere on the X-Y plane or in the Z column, the corresponding controller or controllers start to move to the selected coordinate in accordance to its own movement settings.
- When you press and hold the screen buttons with up, down, left and right arrows, the corresponding axis starts to move in that direction. The movement stops with deceleration when you release the button (soft stop command is sent).
- When you press and hold the keyboard buttons Right, Left, Up, Down, PageUp or PageDown when the joystick block has input focus, the axis X, Y or Z, respectively, starts to move in the direction of increasing or decreasing coordinate. The movement stops with deceleration when you release the button (soft stop command is sent). On receiving input focus the widget background color changes from white to light-green.
The scales of the axes are set in Slider settings block on General motor tab in Settings window separately for each controller. If user units are being used, then the corresponding axis scale is measured in these units. If the position read from any controller is out of its axis range, then the corresponding indicator will not appear on the screen.
5.2.3.3. Control block
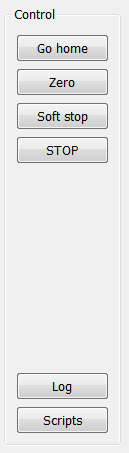
Control block
The Go home button searches for the home position independently for each of the controllers; see Home position settings.
The Zero button resets the current position of the motor and value of the encoder for each controller.
The Soft stop button executes a soft stop for each of the controllers.
Note
The STOP button sends an immediate stop command to each controller, resets their Alarm statuses, clears their command buffers for synchronous motion and stops a script if one is running.
The Log button opens a window with log information. Here you can find diagnostic information (errors, warnings, informational messages) from XiLab, libximc and script sources.
The Scripts button opens a scripting window, see Scripts.
5.2.3.4. Block of status indicators for controllers and motors
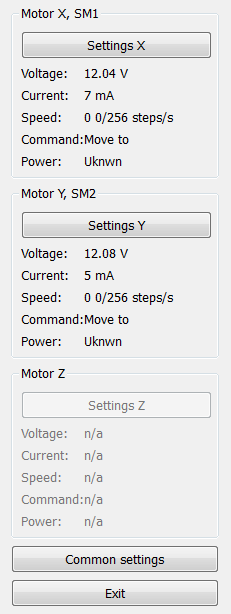
Block of status indicators for controllers and motors
Here are the three blocks of indicators of controllers and motors for axes X, Y and Z. In the title of the block the serial number of corresponding controller is displayed. Each block contains the following indicators:
- Voltage - the voltage at the power section of the motor.
- Current - current power consumption of the motor.
- Speed - current speed of the motor.
- Command - the last command of the controller that was executed, or is being executed.
- Power - the state of the motor power supply.
The buttons Settings X, Y, Z open the configurations of a controller, which corresponds to this axis, see Application settings.
Below the indicator blocks Common settings and Exit buttons are located.
The Common settings button opens a dialog window with general settings. Here you can choose which controller serial numbers are considered “X”, “Y” and “Z” axes, also this window contains logging settings.
The Exit button performs proper shutdown, see Correct shutdown.
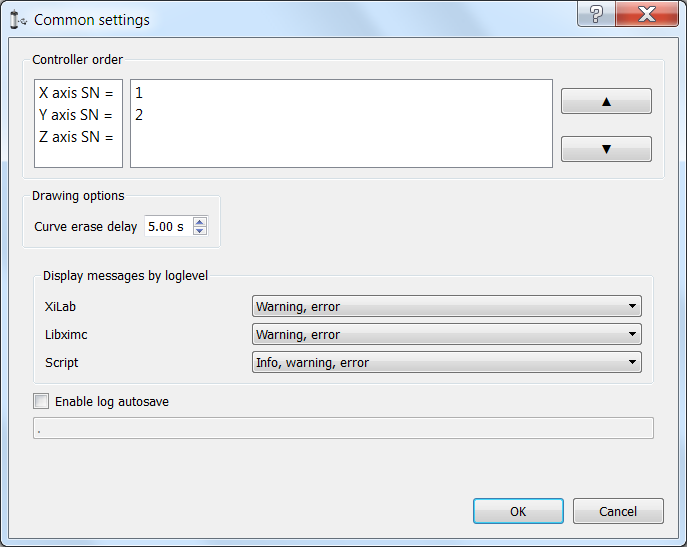
Common settings dialog window
Common settings window contains axis order settings, curve drawing options and logging settings.
You can reorder axes by choosing the axis serial, then pressing “up” or “down” buttons on the right.
First axis in the list, that is, an axis with serial number listed to the right of “X axis SN = ” label will be referred to as “X axis”, the second one as “Y axis”, the third one, if it is available, as “Z axis”.
If you enter a greater than zero value of N seconds in the “curve erase delay” control in the “Drawing options”, then last N seconds of X and Y axis controller motion will be displayed as a trajectory in 2D-space overlaid on the virtual joystick window.
Common logging settings are completely identical to single-axis version logging settings.
Here you can configure logging detail (“None” for no logging, “Error” to only log errors, “Error, Warning” to log errors and warnings, “Error, Warning, Info” to log errors, warnings and informational messages) for each source: XiLab itself, libximc library and Scripts module.
If the autosave option is enabled the log is saved to the file, which is flushed every 5 seconds. It has a name of type “xilab_log_YYYY.MM.DD.csv”, where YYYY, MM and DD are current year, month and day respectively. The log is saved in CSV format.